 Please note: This technique should also work across any theme (not tested on other themes, but the logic is pretty straight forward)
It was the other day that I was searching for “this” particular need on the Internet and came across several articles. While the articles were informative, each of them seemed to be missing basic steps and/or were listing code that produced errors on my site. So for the sake of simplicity and straight forward information, I am listing the procedure in very basic steps so that anyone can add a 2nd, 3rd, 4th……menu to your theme. This lesson does not take into account child themes, it is simply the way to modify your theme as is, right out of the box
(This tutorial assumes you have a basic understanding on how to edit and save your theme files) Really there is only 3 steps, though I’ve taken the time to explain everything to walk you thru it.
+++++++++++++++++++++++++
STEPS:
1) Go into APPEARANCE –>MENUS
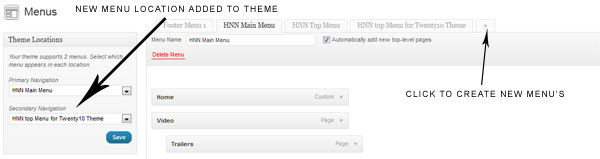
Create a new menu by clicking the (+) sign (tab on top), and then dragging PAGES or CATEGORIES from the left menus to the right. Save this with a name that makes sense…such as “New top menu” or “Footer Menu”
2) Ok now you’ll want to add a piece of code to your FUNCTIONS.PHP file (in your theme folder)
Copy the code “exactly” as you see it (the code contains your “primary” (main) navigation, and now your “secondary” (new) navigation.
Do a search for “wp_nav_menu”
If you are using the Twenty Ten theme then it will look like this:
// This theme uses wp_nav_menu() in one location.
register_nav_menus( array(
‘primary’ => __( ‘Primary Navigation’, ‘twentyten’ ),
) );
Now delete that code and use this one instead:
// This theme uses wp_nav_menu() in 2 locations.
register_nav_menus( array(
‘primary’ => __( ‘Primary Navigation’, ‘twentyten’ ),
‘secondary’ => __( ‘Secondary Navigation’, ‘twentyten’ ),
) );
=======================
What does that do?
It adds a function to your theme, so if you go back into:
APPEARANCE –>MENUS
Under “THEME LOCATIONS” on the left, you should now see a “Secondary Navigation” under the ” Primary Navigation”
=======================
3)– Now go ahead and choose the NEW menu you created in step #1 from the drop down list under ” Secondary Navigation”
(see my graphic example)
4) OK halfway there! The Theme now recognizes the new navigation AND you have a “menu” to go INTO that navigation
Don’t see it yet on your site?
Thats right, 1 more step to go, before its live! You’ve only added code to the back end at this point.
Now this part is simply a matter of where you WANT to place the code that shows up on your HOME (front page). For this tutorial I’ve placed mine at the top just above the header……though, you can really place it where ever you like (for instance just below the main navigation or in the footer) (I’ll give you tips on those choices later)
So to get started, I am placing mine just above the top banner header.
To do that, locate the code (inside your HEADER.PHP file)
<div id=”masthead”>
and drop this code right below it
<!– top navigation add to the theme–>
<div id=”access” role=”navigation”>
<?php wp_nav_menu( array( ‘container_class’ => ‘menu-header’, ‘theme_location’ => ‘secondary’ ) ); ?>
</div>
<!– END top navigation add to the theme–>
SAVE and check out your blog!
Notes / Tips:
The last bit of code you added can be moved wherever you like within you HEADER.PHP file. (well, experiment a bit, that is)
So if you wanted it under you existing navigation, then move it down farther in the code
======================
CSS NOTE: (very important)
You’ll want to style your menu separately. In the code above it references “access” within your css “STYLE.CSS” file. What I recommend is to go in and copy all your files named #access and rename them to something else, such as #access-top. Then re-paste, back in your “STYLE.CSS” file, so that you can style that menu separately from your main navigation bar.
This gives you control over the bar separate from the other, and lets you give it a different look and feel
See new code with new css added:
<!– top navigation add to the theme–>
<div id=”access-top” role=”navigation”>
<?php wp_nav_menu( array( ‘container_class’ => ‘menu-header’, ‘theme_location’ => ‘secondary’ ) ); ?>
</div>
<!– END top navigation add to the theme–>
======================
—————————————
ADDING MORE than 2?
If you follow the steps above you’ll notice that you can add more navigation bars by doing 2 things:
1– Add another navigation to this code
// This theme uses wp_nav_menu() in 2 locations.
register_nav_menus( array(
‘primary’ => __( ‘Primary Navigation’, ‘twentyten’ ),
‘secondary’ => __( ‘Secondary Navigation’, ‘twentyten’ ),
) );
So it would now look like this: (notice the “Secondary2” added!)
// This theme uses wp_nav_menu() in 3 locations.
register_nav_menus( array(
‘primary’ => __( ‘Primary Navigation’, ‘twentyten’ ),
‘secondary’ => __( ‘Secondary Navigation’, ‘twentyten’ ),
‘secondary2’ => __( ‘Secondary2 Navigation’, ‘twentyten’ ),
) );
Get it?
2- You’ll also need this code again (below) pasted in a different places (though rename “secondary’ to something else such as “Secondary2”
<!– top navigation add to the theme–>
<div id=”access-top” role=”navigation”>
<?php wp_nav_menu( array( ‘container_class’ => ‘menu-header’, ‘theme_location’ => ‘Secondary2‘ ) ); ?>
</div>
<!– END top navigation add to the theme–>
If you want it in your “footer”, then use the code in your FOOTER.PHP file instead
+++++++++++++++++++++++++++++++++++++++++++++++++++++++++++++++++++++++++++++++++++++++++++++++++++
(make sure you save a backup of your FUNCTIONS.PHP & HEADER.PHP files in case you mis-type your codes)
TO REVIEW:
1) 2 codes added (1 goes into FUNCTIONS.PHP, the other goes into HEADER.PHP
2) New menu created in APPEARANCE–>MENUS
3) CSS code added (using existing) to work for new menu bar